(WebGL) Animated selective glow in Three.js

This time I'm going to explain a way to make specific parts of your 3D object glow, and how to animate those. For this I'll be using THREE.EffectComposer to render the glow passes.
Check out the demo and the code after the break.
Demo
Animated selective glow demo (Best viewed in Chrome or Firefox)
[NEW] Selective glow, particles and icosahedron geometry.
Selective glow using glow maps
In order to make only certain parts of the 3D object glow, I'll be using glow maps.
These maps are like transparency maps, which means that they are grayscaled, but in our case, the white intensity will have an effect on the glow intensity and not transparency.
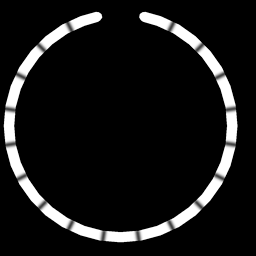
As you can see, I'm using a small 256*256 map because in my example, the glow map is not very detailed. This means that by reducing the map size, we won't be loosing any detail and the file size will be fairly low.
By rendering the scene with these glow maps, we will obtain a final buffer with the glow intensity data. We will then be able to use this glow intensity data in our final composer.
Preparing the objects
To render our scene with the glow textures we need to create a separate scene, with the same objects, but with a new camera and new geometries. This is a safe way to prevent unexpected rendering issues, because Three.js and the WebGL renderer often act unexpectedly when trying to render the same geometries with different materials. So to avoid any bad behaviour, it is advised to clone every object and geometries in another scene. with meshes with their glow maps (see Update).
Therefore we need to initialise two scenes, one for the main render, and one for the glow pass.
// MAIN SCENE
scene = new THREE.Scene();
scene.add( new THREE.AmbientLight( 0xffffff ) );
camera = new THREE.PerspectiveCamera( 75, SCREEN_WIDTH / SCREEN_HEIGHT, 1, 100000 );
camera.position.z = 140;

// GLOW SCENE
glowscene = new THREE.Scene();
glowscene.add( new THREE.AmbientLight( 0xffffff ) );
And when you add your 3D object to the scene, you will have to add a cloned version of that object with its glow map to the glow scene.
function createScene( geometry, x, y, z, b ) {

	// Base object
	zmesh = new THREE.Mesh( geometry, new THREE.MeshFaceMaterial() );
	zmesh.position.set( x, y, z );
	zmesh.scale.set( 3, 3, 3 );
	zmesh.overdraw = true;
	scene.add( zmesh );

	// Create the glow map material
	var gmap = THREE.ImageUtils.loadTexture('glowmap.png');
	// Use the same material type than the diffuse pass to prevent issues, only with white ambient to shut off diffuse component.
	var gmat = new THREE.MeshPhongMaterial( { map: gmap, ambient: 0xffffff, color: 0x000000 } );;

	// Create mesh with the glow material
	var gmesh = new THREE.Mesh(geometry, gmat);

	// Map cloned mesh properties to base mesh
	gmesh.position = zmesh.position;
	gmesh.scale = zmesh.scale;
	gmesh.overdraw = true;

	// Add the cloned mesh to the glow scene
	glowscene.add(gmesh);
}
The comment on line 13 is about an issue when rendering the same geometry with different material types. So make sure you use the same material types (here a THREE.MeshPhongMaterial because the MeshFaceMaterial of the base mesh refers to the Phong material depicted in the 3D model file) for both the diffuse render and the glow render.
Rendering glow using effect composer
To apply the selective glow effect to our base scene, we will have to render the glow scene to a FrameBuffer, blur it, before blending it additively to the base render output.
These steps will be done using THREE.EffectComposer and THREE.ShaderExtras.
First we need an EffectComposer to render the glow scene and apply a blur on it.
// Prepare the glow composer's render target
var renderTargetParameters = { minFilter: THREE.LinearFilter, magFilter: THREE.LinearFilter, format: THREE.RGBFormat, stencilBufer: false };
renderTargetGlow = new THREE.WebGLRenderTarget( SCREEN_WIDTH, SCREEN_HEIGHT, renderTargetParameters );

// Prepare the blur shader passes
hblur = new THREE.ShaderPass( THREE.ShaderExtras[ "horizontalBlur" ] );
vblur = new THREE.ShaderPass( THREE.ShaderExtras[ "verticalBlur" ] );

var bluriness = 3;

hblur.uniforms[ "h" ].value = bluriness / SCREEN_WIDTH;
vblur.uniforms[ "v" ].value = bluriness / SCREEN_HEIGHT;

// Prepare the glow scene render pass
var renderModelGlow = new THREE.RenderPass( glowscene, camera);

// Create the glow composer
glowcomposer = new THREE.EffectComposer( renderer, renderTargetGlow );

// Add all the glow passes
glowcomposer.addPass( renderModelGlow );
glowcomposer.addPass( hblur );
glowcomposer.addPass( vblur );
That way we will be able to use glowcomposer.render() in our render loop to render the glow buffer.

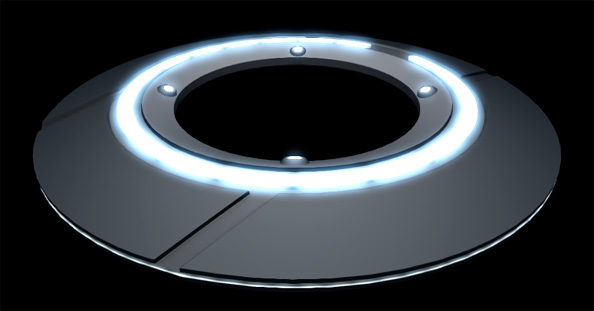
Above is the glow scene's RenderPass, below is the blurred result.

Blending the glow buffer to the base scene
First, we will need to write a quick additive blending shader since Three.js doesn't have one built-in.
var finalshader = {
	uniforms: {
		tDiffuse: { type: "t", value: 0, texture: null }, // The base scene buffer
		tGlow: { type: "t", value: 1, texture: null } // The glow scene buffer
	},

	vertexShader: [
		"varying vec2 vUv;",

		"void main() {",

			"vUv = vec2( uv.x, 1.0 - uv.y );",
			"gl_Position = projectionMatrix * modelViewMatrix * vec4( position, 1.0 );",

		"}"
	].join("n"),

	fragmentShader: [
		"uniform sampler2D tDiffuse;",
		"uniform sampler2D tGlow;",

		"varying vec2 vUv;",

		"void main() {",

			"vec4 texel = texture2D( tDiffuse, vUv );",
			"vec4 glow = texture2D( tGlow, vUv );",
			"gl_FragColor = texel + vec4(0.5, 0.75, 1.0, 1.0) * glow * 2.0;", // Blend the two buffers together (I colorized and intensified the glow at the same time)

		"}"
	].join("n")
};
Next step is to render the base scene using another RenderPass and blend it with the glow buffer using another EffectComposer.
// First we need to assign the glow composer's output render target to the tGlow sampler2D of our shader
// Old Three.js pre-r50
//finalshader.uniforms[ "tGlow" ].texture = glowcomposer.renderTarget2;
// New Three.js
finalshader.uniforms[ "tGlow" ].value = glowcomposer.renderTarget2;
// Note that the tDiffuse sampler2D will be automatically filled by the EffectComposer

// Prepare the base scene render pass
var renderModel = new THREE.RenderPass( scene, camera );

// Prepare the additive blending pass
var finalPass = new THREE.ShaderPass( finalshader );
finalPass.needsSwap = true;

// Make sure the additive blending is rendered to the screen (since it's the last pass)
finalPass.renderToScreen = true;

// Prepare the composer's render target
renderTarget = new THREE.WebGLRenderTarget( SCREEN_WIDTH, SCREEN_HEIGHT, renderTargetParameters );

// Create the composer
finalcomposer = new THREE.EffectComposer( renderer, renderTarget );

// Add all passes
finalcomposer.addPass( renderModel );
finalcomposer.addPass( finalPass );
Render everything
Finally, the last step is to call the two composers' render method in the main render loop.
function animate() {
	requestAnimationFrame( animate );
	render();
}

function render() {
	glowcomposer.render();
	finalcomposer.render();
}
Animating
Now to animate the glow, all you have to do is either use a video texture as glow map, or do like I did in the demo: use a Texture sequence:
// Create a texture sequence
glowTexLen = 20;
glowTexIndex = 0;
glowTexSeq = [];
for(i = 0; i < glowTexLen; i++)
{
	glowTexSeq[i] = THREE.ImageUtils.loadTexture('tron/seq/glowseq_'+i+'.png');
}

// When rendering, change the object's glow map using a time variable
var t = 0.0;
function render() {
	t += .01;

	var i = Math.floor(t*2 % glowTexLen);
	if(i != glowTexIndex)
	{
		glowTexIndex = i;
		// glowTexRef is a reference to the cloned glow Object3D
		glowTexRef.material.map = glowTexSeq[glowTexIndex];
	}

	glowcomposer.render();
	finalcomposer.render();
}
Note that I'm not using THREE.Clock or any time-based delta's when animating, so the glow animation speed will be affected by FPS.
Final tips and tricks
- When rendering the same object with different materials, always clone the geometry.
- When needing more than one RenderPass, it is advised to use separate composers to prevent depth buffer destruction.
- To increase the glow blur quality, simply apply more consecutive hblur/vblur passes
While this code is not optimized at all, it's there to demonstrate a way to render selective glow in Three.js.
Don't hesitate to ask questions in the comments, I'll be glad to answer them as best as I can.
Update
As pointed out by alteredq, a cheaper solution than cloning geometry is to use another THREE.MeshPhongMaterial (the same used for the diffuse scene) to render the glow pass.
This effectively solves our issue while keeping the same geometry for both passes.
I'll update the two demos and the code accordingly.
 XML/RSS Feed